Download Microsoft.70-745.Prep4Sure.2018-11-09.30q.tqb
| Vendor: | Microsoft |
| Exam Code: | 70-745 |
| Exam Name: | Implementing a Software-Defined Datacenter |
| Date: | Nov 09, 2018 |
| File Size: | 1 MB |

Demo Questions
Question 1
You need to configure the network settings for the SLB in the test environment.
Which two actions should you perform? Each correct answer presents part of the solution.
NOTE: Each correct selection is worth one point.
- Create a logical network that uses the Private VLAN networks option.
- Create a logical network that uses the One connected network option.
- Create a private VIP and IP address pool that uses the IP range 10.10.90.2 - 10.10.90.254. Create a public VIP and IP address pool that uses the IP range 10.10.20.2 – 10.10.20.254.
- Create a private VIP and IP address pool that uses the IP range 10.40.90.2 - 10.40.90.254. Create a public VIP and IP address pool that uses the IP range 10.40.20.2 – 10.40.20.254.
Correct answer: AD
Explanation:
References:https://blogs.technet.microsoft.com/larryexchange/2016/05/31/step-by-step-for-deploying-a-sdnv2-using-vmm-part-3/ References:
https://blogs.technet.microsoft.com/larryexchange/2016/05/31/step-by-step-for-deploying-a-sdnv2-using-vmm-part-3/
Question 2
You need to deploy the production SCVMM instance.
Which values should you supply for each installation option? To answer, select the appropriate options in the answer area.
NOTE: Each correct selection is worth one point.
Correct answer: To work with this question, an Exam Simulator is required.
Explanation:
When you install VMM you need to configure the VMM service to use either the Local System account or a domain account. If you specify a domain account, the account must be a member of the local Administrators group on the computer. References:https://docs.microsoft.com/en-us/system-center/vmm/plan-install?view=sc-vmm-1801#account-and-domain-requirements When you install VMM you need to configure the VMM service to use either the Local System account or a domain account. If you specify a domain account, the account must be a member of the local Administrators group on the computer.
References:
https://docs.microsoft.com/en-us/system-center/vmm/plan-install?view=sc-vmm-1801#account-and-domain-requirements
Question 3
You need to create the VM network for the development environment.
Which four actions should you perform in sequence? To answer, move the appropriate actions from the list of actions to the answer area and arrange them in the correct order.
Correct answer: To work with this question, an Exam Simulator is required.
Explanation:
To create a logical network 1. Open the Fabric workspace. 2. On the Home tab, in the Show group, click Fabric Resources. 3. In the Fabric pane, expand Networking, and then click Logical Networks. 4. On the Home tab, in the Create group, click Create Logical Network. The Create Logical Network Wizard opens. 5. On the Name page, do the following:* Enter a name and optional description for the logical network. For example, enter the name BACKEND, with the description Corporate network. Use for internal servers such as application and database servers. * If you have System Center 2012 SP1 or System Center 2012 R2, select check boxes as appropriate by using the table that follows. Otherwise, skip to the next numbered step in this procedure. Select one or more check boxes based on how you intend to use the VM networks that will be configured on top of this logical network. The following table provides guidelines: 6. Click Next. 7. On the Network Site page, take the following steps. Note For guidelines for configuring network sites, see “Network sites” in Configuring Logical Networking in VMM Overview. If you do not need to configure network sites, on the Network Site page, click Next, and then click Finish to complete the wizard. 1. To create a network site, click Add. VMM automatically generates a site name that consists of the logical network name, followed by an underscore and a number. 2. Review the network site name and ensure that it is no longer than 64 characters. To change the default name, in the Network site name box, enter a new name for the network site. For example, enter the name BACKEND - Seattle. 3. Under Host groups that can use this network site, select the check box next to each host group to which you want to make the logical network available. For example, to make the BACKEND logical network available to the Seattle host group and all its child host groups, select the check box next to Seattle. 4. Under Associated VLANs and IP subnets, enter the VLANs and IP subnets that you want to assign to the network site. To enter VLAN and IP subnet information, click Insert row, click the field under VLAN or IP subnet, depending on what you want to configure, and then enter a VLAN, an IP subnet, or a subnet/VLAN pair. You can insert multiple rows. For example, add the IP subnet/VLAN pair that makes up the example BACKEND network in Seattle, as shown in the following table. Important In your test environment, make sure that you use VLANs and IP subnets that are available in your network. 5. Optionally, create additional network sites by clicking Add and repeating the process. 6. When you complete this step, click Next. 8. On the Summary page, review the settings, and then click Finish. The Jobs dialog box appears. Make sure the job has a status of Completed, and then close the dialog box. 9. Verify that the logical network appears in the Logical Networks and IP Pools pane. Also, if you added network sites, right-click the logical network, click Properties, click the Network Site tab, and verify that the intended network sites appear on the tab. References:https://technet.microsoft.com/en-us/library/gg610588(v=sc.12).aspx To create a logical network
1. Open the Fabric workspace.
2. On the Home tab, in the Show group, click Fabric Resources.
3. In the Fabric pane, expand Networking, and then click Logical Networks.
4. On the Home tab, in the Create group, click Create Logical Network.
The Create Logical Network Wizard opens.
5. On the Name page, do the following:
* Enter a name and optional description for the logical network.
For example, enter the name BACKEND, with the description Corporate network. Use for internal servers such as application and database servers.
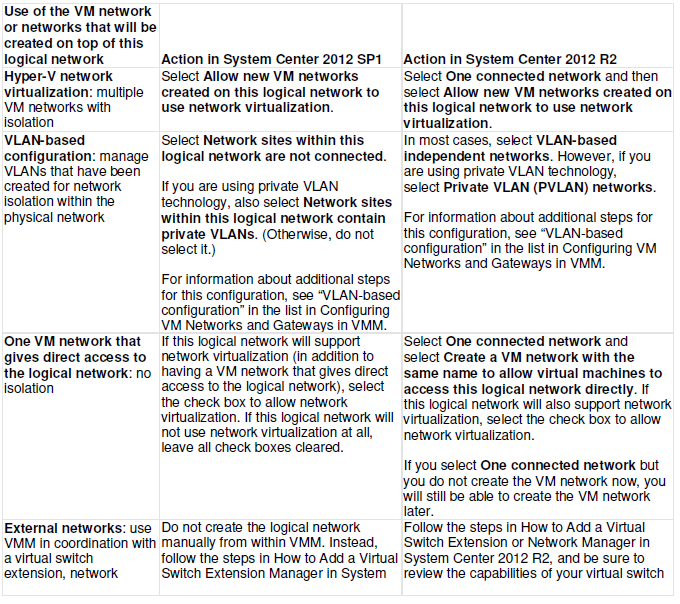
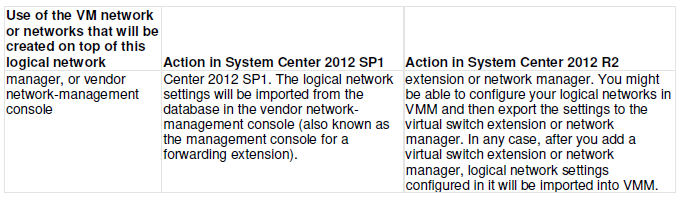
* If you have System Center 2012 SP1 or System Center 2012 R2, select check boxes as appropriate by using the table that follows. Otherwise, skip to the next numbered step in this procedure.
Select one or more check boxes based on how you intend to use the VM networks that will be configured on top of this logical network. The following table provides guidelines:
6. Click Next.
7. On the Network Site page, take the following steps.
Note
For guidelines for configuring network sites, see “Network sites” in Configuring Logical Networking in VMM Overview. If you do not need to configure network sites, on the Network Site page, click Next, and then click Finish to complete the wizard.
1. To create a network site, click Add.
VMM automatically generates a site name that consists of the logical network name, followed by an underscore and a number.
2. Review the network site name and ensure that it is no longer than 64 characters. To change the default name, in the Network site name box, enter a new name for the network site.
For example, enter the name BACKEND - Seattle.
3. Under Host groups that can use this network site, select the check box next to each host group to which you want to make the logical network available.
For example, to make the BACKEND logical network available to the Seattle host group and all its child host groups, select the check box next to Seattle.
4. Under Associated VLANs and IP subnets, enter the VLANs and IP subnets that you want to assign to the network site. To enter VLAN and IP subnet
information, click Insert row, click the field under VLAN or IP subnet, depending on what you want to configure, and then enter a VLAN, an IP subnet, or a subnet/VLAN pair. You can insert multiple rows.
For example, add the IP subnet/VLAN pair that makes up the example BACKEND network in Seattle, as shown in the following table.

Important
In your test environment, make sure that you use VLANs and IP subnets that are available in your network.
5. Optionally, create additional network sites by clicking Add and repeating the process.
6. When you complete this step, click Next.
8. On the Summary page, review the settings, and then click Finish.
The Jobs dialog box appears. Make sure the job has a status of Completed, and then close the dialog box.
9. Verify that the logical network appears in the Logical Networks and IP Pools pane. Also, if you added network sites, right-click the logical network, click Properties, click the Network Site tab, and verify that the intended network sites appear on the tab.
References:
https://technet.microsoft.com/en-us/library/gg610588(v=sc.12).aspx