Download Microsoft.70-411.PracticeTest.2019-01-26.181q.tqb
| Vendor: | Microsoft |
| Exam Code: | 70-411 |
| Exam Name: | Administering Windows Server 2012 |
| Date: | Jan 26, 2019 |
| File Size: | 19 MB |

Demo Questions
Question 1
Your network contains an Active Directory domain named contoso.com. All servers run Windows Server 2012 R2. The functional level of both the domain and the forest is Windows Server 2008 R2.
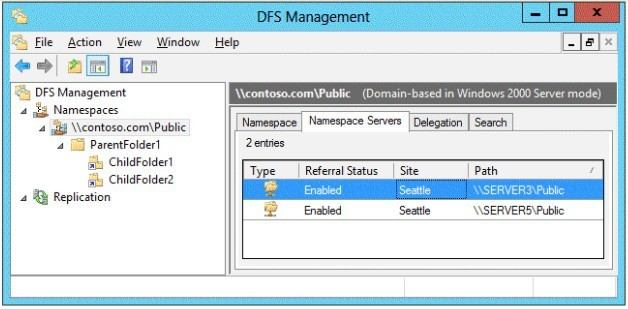
The domain contains a domain-based Distributed File System (DFS) namespace that is configured as shown in the exhibit.
You need to enable access-based enumeration on the DFS namespace.
What should you do first?
- Raise the domain functional level.
- Raise the forest functional level.
- Install the File Server Resource Manager role service on Server3 and Server5.
- Delete and recreate the namespace.
Correct answer: D
Explanation:
Access-based enumeration is only supported on a Domain-based Namespace in Windows Server 2008 Mode. This type of Namespace requires a minimum Windows Server 2003 forest functional level and a minimum Windows Server 2008 domain functional level. The exhibit indicates that the current namespace is a Domain-based Namespace in Windows Server 2000 Mode. To migrate a domain-based namespace from Windows 2000 Server mode to Windows Server 2008 mode, you must export the namespace to a file, delete the namespace, recreate it in Windows Server 2008 mode, and then import the namespace settings. Reference:http://msdn.microsoft.com/en-us/library/cc770287.aspxhttp://msdn.microsoft.com/en-us/library/cc753875.aspx Access-based enumeration is only supported on a Domain-based Namespace in Windows Server 2008 Mode. This type of Namespace requires a minimum Windows Server 2003 forest functional level and a minimum Windows Server 2008 domain functional level.
The exhibit indicates that the current namespace is a Domain-based Namespace in Windows Server 2000 Mode. To migrate a domain-based namespace from Windows 2000 Server mode to Windows Server 2008 mode, you must export the namespace to a file, delete the namespace, recreate it in Windows Server 2008 mode, and then import the namespace settings.
Reference:
http://msdn.microsoft.com/en-us/library/cc770287.aspx
http://msdn.microsoft.com/en-us/library/cc753875.aspx
Question 2
Your network contains an Active Directory domain named contoso.com. The domain contains a server named Server1 that runs Windows Server 2012 R2.
A local account named Admin1 is a member of the Administrators group on Server1.
You need to generate an audit event whenever Admin1 is denied access to a file or folder.
What should you run?
- auditpol.exe /set /user:admin1 /failure:enable
- auditpol.exe /set /user:admin1 /category:"detailed tracking" /failure:enable
- auditpol.exe /resourcesacl /set /type:file /user:admin1 /failure
- auditpol.exe /resourcesacl /set /type:key /user: admin1 /failure /access:ga
Correct answer: C
Explanation:
To set a global resource SACL to audit successful and failed attempts by a user to perform generic read and write functions on files or folders:auditpol /resourceSACL /set /type: File /user:MYDOMAINmyuser /success /failure /access: FRFWSyntax auditpol /resourceSACL [/set /type: <resource> [/success] [/failure] /user: <user> [/access: <access flags>]][/remove/type: <resource>/user: <user> [/type: <resource>]][/clear [/type: <resource>]][/view [/user: <user>] [/type: <resource>]]References:http://technet.microsoft.com/en-us/library/ff625687(v=ws.10).aspxhttp://technet.microsoft.com/en-us/library/ff625687.aspx To set a global resource SACL to audit successful and failed attempts by a user to perform generic read and write functions on files or folders:
auditpol /resourceSACL /set /type: File /user:MYDOMAINmyuser /success /failure /access: FRFW
Syntax
auditpol /resourceSACL
[/set /type: <resource> [/success] [/failure] /user: <user> [/access: <access flags>]]
[/remove/type: <resource>/user: <user> [/type: <resource>]]
[/clear [/type: <resource>]]
[/view [/user: <user>] [/type: <resource>]]
References:
http://technet.microsoft.com/en-us/library/ff625687(v=ws.10).aspx
http://technet.microsoft.com/en-us/library/ff625687.aspx
Question 3
You have a server named Server1 that runs Windows Server 2012 R2.
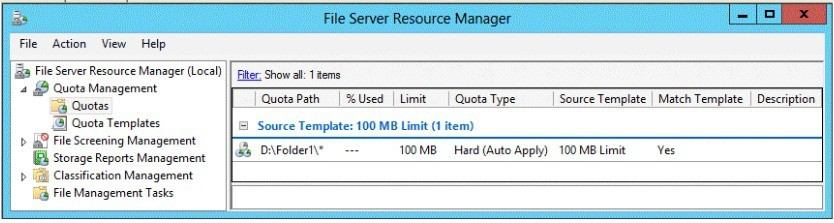
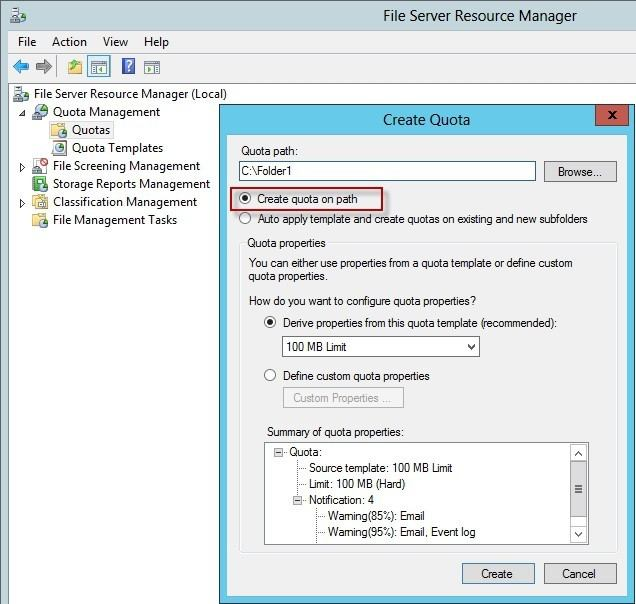
An administrator creates a quota as shown in the Quota exhibit.
You run the dir command as shown in the Dir exhibit.
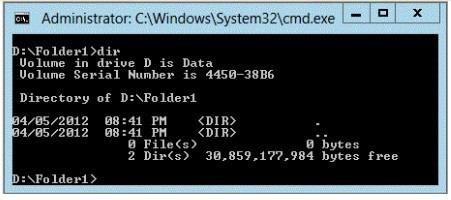
You need to ensure that D:\Folder1 can only consume 100 MB of disk space.
What should you do?
- From File Server Resource Manager, create a new quota.
- From File Server Resource Manager, edit the existing quota.
- From the Services console, set the Startup Type of the Optimize drives service to Automatic.
- From the properties of drive D, enable quota management.
Correct answer: A
Explanation:
In Quota Management, click the Quota Templates node. In the Results pane, select the template on which you will base your new quota. Right-click the template and click Create Quota from Template (or select Create Quota from Template from the Actions pane). This opens the Create Quota dialog box with the summary properties of the quota template displayed. Under Quota path, type or browse to the folder that the quota will apply to. Click the Create quota on path option. Note that the quota properties will apply to the entire folder. Note: To create an auto apply quota, click the Auto apply template and create quotas on existing and new subfolders option. For more information about auto apply quotas, see Create an Auto Apply Quota.Under Drive properties from this quota template, the template you used in step 2 to create your new quota is preselected (or you can select another template from the list). Note that the template's properties are displayed under Summary of quota properties. Click Create. Create a new Quota on path, without using the auto apply template and create quota on existing and new subfolders. Reference: http://technet.microsoft.com/en-us/library/cc755603(v=ws.10).aspx - In Quota Management, click the Quota Templates node.
- In the Results pane, select the template on which you will base your new quota.
- Right-click the template and click Create Quota from Template (or select Create Quota from Template from the Actions pane). This opens the Create Quota dialog box with the summary properties of the quota template displayed.
- Under Quota path, type or browse to the folder that the quota will apply to.
- Click the Create quota on path option. Note that the quota properties will apply to the entire folder. Note: To create an auto apply quota, click the Auto apply template and create quotas on existing and new subfolders option. For more information about auto apply quotas, see Create an Auto Apply Quota.
- Under Drive properties from this quota template, the template you used in step 2 to create your new quota is preselected (or you can select another template from the list). Note that the template's properties are displayed under Summary of quota properties.
- Click Create. Create a new Quota on path, without using the auto apply template and create quota on existing and new subfolders.
Reference: http://technet.microsoft.com/en-us/library/cc755603(v=ws.10).aspx